Pages

Friday 26 September 2014

One for Sorrow

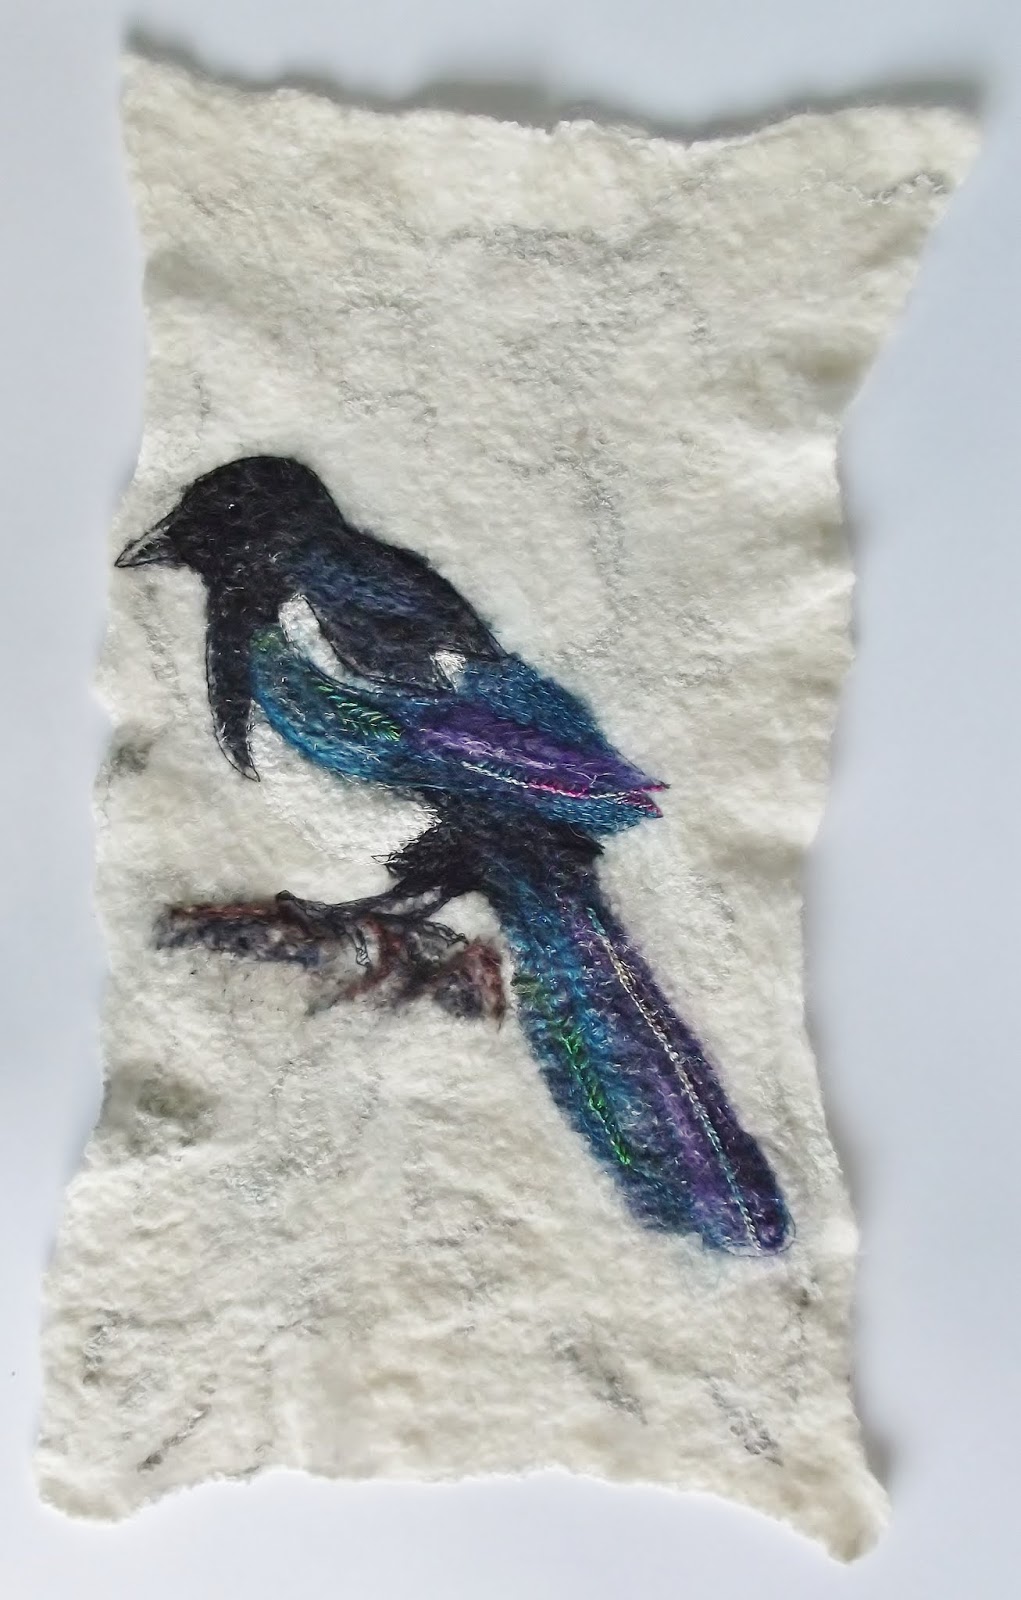
One for Sorrow. Felt and embroidery, 2014

Wow, another week flown by. I seem to have been very busy this week and when I was thinking about it I thought I didn't have much to show for it but when I started looking at my photographs from the week I realised I did have a few things. One of which is another finished magpie piece.

Ink and paint on paper

Felt and embroidery

I wrote last week about my ongoing magpie obsession and the drawings I had been working on. I also introduced a textile piece with the promise of more information to follow. Being a person of my word here is that information! Based on one of my inky drawings, this piece is nuno felted with machine and hand embroidery and needle felting.

Laying out the base fibres

Starting the magpie

Nuno felting essentially involves making felt through fabric, most usually fine fabrics are used and the fibres felt through the material. The main qualities of this type of felting are it's strength and lightness; because there is a stable fabric base it is possible to make a fine and lightweight felt (basically using fewer fibres) that is still strong. I used silk chiffon as my base fabric and built up a base of mixed sheep fibres and hand dyed silk fibres. I laid them out very finely in layers of alternating direction so that I would have a stable but still lightweight base for my magpie.

Building up the image

Building up the image

Having laid out my base and using my drawing as a guide I began to build up my magpie. I used a range of fibres, including merino and bamboo and a lot of silk. I wanted the finished piece to have a luxurious but subtle sheen which is why I used a lot of silk (that and the fact that if I keep buying all these beautiful silk fibres and don't use them our house may explode in a glorious colour filled ball of fluff.)

Starting to felt

The finished felt

Once all the fibres are laid out the alchemy begins; using nothing but hot water, a little soap and a fair amount of physical effort the pile of fluff is transformed into a fabric. Basically the hot soapy water opens up the scales on the fibres and then the friction caused by rolling it back and forth against a rough surface (such as a bamboo mat) causes the fibres to tangle together, creating felt. As anyone who has hot washed a woollen jumper will know, hot water and friction cause wool to shrink (that's those fibres tangling together) so whilst the original piece was around A2 when laid out after felting it is closer to A3 size.

My tidy(!) workspace

Magpie detail

When the felt had dried out I was able to start working on developing the magpie. I spent a long time deciding how to work into this piece, playing around with ideas and thinking through the process. I decided to begin by adding some definition with machine embroidery. I used silk thread to match the fibres and to add a subtle sheen to the stitches. The good thing about stitching is that if it all goes horribly wrong or you don't like the effect you can always unpick it.

Tail detail

Wing detail

Having added machine embroidery I still didn't think the piece was finished but I did not want to completely cover the piece with stitch as I wanted to keep the subtle colour variations in the felt. So, I added a little hand stitch, unpicking and re-stitching until I was satisfied. However, there was still something missing so I began playing around with the fibres again. During the felting process a lot of the silk I'd originally laid down had got hidden under the wool fibres as they tangled together so I needle felted more silk on top. I also partially covered some of the hand stitching to help it blend in. I knew it was finished when I didn't know what to add next.

Upper wing detail

Foot detail

The name of the piece is taken from the children's nursery rhyme about magpies; one for sorrow two for joy and so on. I rarely give my pieces titles until they are finished even if I have an idea of what to call them as they change and develop throughout the making process and rarely resemble what I had in my head to start with. I had never intended for him to be sorrowful but it's just the way he's turned out.

Head detail


Friday 19 September 2014

Magpie Madness

Perching Magpie. Ink and paint. 2014

I've been really lucky this week and have had two almost full days in my studio. I've been able to get going on a couple of the projects buzzing around in my head and this has lead to a sense of creative satisfaction and a plethora of new ideas.


Colouring in

Building up colour

I have been continuing with my magpie obsession and spent Wednesday working on some big drawings to help me plan out my textile pieces and clarify my ideas and thoughts. I've also been keeping my daily drawing going which I think is really helping with keeping me working. I'd say focused and motivated but I think inspired to continue is probably more accurate.


Adding water

The first big drawing I worked on is pretty big (A1 and a bit) because I have serious scale issues, I just can't draw or make anything small. I try but however large the piece of paper I start with my drawings always fall of the end so I have to add some more paper to catch them.

Detail

Head detail

After roughly sketching out my magpie in pencil I used water soluble crayons to build up the colours of the plumage. The crayons are really chunky and very satisfying to work with and I felt a little bit like a child colouring in (which is an excellent feeling.) I then added water so the crayons became more like paint. I like the slight unpredictability of this part of the process. However carefully you layer and blend your colours you never know quite what's going to happen, the water flows as it pleases, sometimes taking much of your hard work with it.

Flying Magpie. Water soluble crayon, ink and oil pastels. 2014

Flying Magpie. Water soluble crayon, ink and oil pastels. 2014 

I also added a watery inky background and again the water flowed into my drawing, sometimes where I wanted it sometimes not so much. When the water had dried I added highlights to the plumage using iridescent oil pastels. They shimmer beautifully in the light but don't photograph well (or more likely my photography skills are lacking) so you'll have to take my word for it!

Standing Magpie. Inks on prepared paper. 2014

Standing Magpie detail

Standing Magpie detail


When I'd finished this large drawing I worked on a couple of smaller drawings. I was interested in trying to capture the shimmering, changing colours of the magpies plumage and the stark black and white contrast. I decided to have a play with inks, like using water there is an unpredictability which I like and I love the way the colours bleed and blend together creating beautiful patterns.

Detail of Perching Magpie

Detail of Perching Magpie

Detail of Perching Magpie

I had prepared some papers earlier in the day with washes of watercolour and I chose to work on these rather than on plain paper as I wanted all the contrast to be on the bird and not with the background. I had a few accidents with the ink along the way but a bit of paint and reworking and I ended up with two drawings I'm really pleased with.

Laying out fibres for nuno felting

Nuno felted piece drying out

Today I started working in textiles from my drawings. I had intended to use the big flying magpie as a starting point for a nuno felted piece but I was more drawn to the perching magpie so I went with that instead. Using chiffon as a base I laid out my magpie using dyed wool and silk fibres and then felted the piece. It is currently drying in my studio awaiting it's embroidery. I'll write a bit more about it in a future post as there are enough words here already!

Wednesday 17 September 2014

Life Drawing 16.9.14

Pen, continuous line, 3 minutes

After a break and a re-organise this week saw the return of my life drawing classes. I have changed days, times and venue and instead of being every other week I am trying out running the sessions once a month instead. So, lots of changes but it was really good to see familiar faces again; I am very lucky to have a regular group of people who support my sessions and are a large part of the reason I keep them going.

Overlapping sketches

Hand studies, pen

Running life drawing sessions is a funny thing, there is lots of interest and people keep complaining about the lack of opportunities to do life drawing and yet I struggle to get enough people to come to sessions and from talking to other organisers this is not a problem unique to me.

Pen, continuous line

Pen, continuous line

Anyway, I digress. The session went well, the new space is lovely to work in and our model gave us some excellent poses. I have been getting back into daily drawing but despite this I felt very rusty and it took me a while to get into the flow of drawing. My proportions were a bit out in a lot of my drawings and there were a couple of times I just couldn't get it to work as I wanted but I enjoyed the session and felt myself improving  as the session went on.

Pencil, 5 minutes

Pen, continuous line

I worked mostly in pen and continuous line as I wanted to work with something I was familiar and comfortable with until I got back into the swing of it. I was really struggling with one of the poses (a longish pose of 30 minutes) so I got out my trusty permanent markers and worked with them. You have to work really quickly with permanent marker otherwise it just makes a hole in the paper so it's a good thing to turn to when you need to loosen up and just draw.

Pen, continuous line

Pen, continuous line

'Blind' drawing, single line

I did a drawing of the models feet with the permanent marker that I was really pleased with. I hardly looked at the paper and drew really quickly. I like working in this way, it's almost like bypassing the thinking part of your brain and letting your eyes talk directly to your hands. Sometimes the results are rather strange but I find it helps capture the idea of a pose and it has, for me, an appealing simplicity and immediacy.

Permanent marker, continuous line

Permanent marker, continuous line

It will be interesting to see how my drawing is next session, a month is quite a long time but hopefully I won't have rusted up too much!


Friday 12 September 2014

A Drawing a Day

Pen drawing of a feather 4.9.14

During our first summer holiday at University (a long time ago now, sigh) one of the projects we were set was to produce a drawing a day. It is an excellent discipline to get into and sounds so very achievable, surely a few moments can be found each day to produce a small sketch? Inevitably it is not as easy as it sounds and suddenly you realise it's a week since your last drawing. However, it really is a good thing to do and it is something I have come back to sporadically in the years since I graduated.

Carbon paper and knitting needles 4.9.14

As you have probably guessed one of those times is now. Whenever I re-start my drawing a day programme I always wonder why I don't always do this. I like to work in a sketchbook and flick back through and see how my drawing is improving again. Just like exercising a muscle if you don't draw regularly your ability falls, but is quickly regained once you start again.

Plants on my desk in pen 5.9.14

Magpie sketch in pen 5.9.14

Detail of magpie

I believe drawing is very important, not just for artists but for everyone, it has been described as the primary means of expression and I would whole heartedly agree with this. When you draw you don't just look, you see. You stop, take the time to observe and notice, to analyse and investigate. This is then translated and interpreted into a unique expression of how you saw something in that moment. Drawing is personal.

Stuff on my desk in pen 6.9.14

As children one of the first ways we start to understand the world around us and communicate is to use drawings, as Picasso said "All children are artists. The problem is how to remain an artist once he grows up." As language and the pressure to get it 'right' increases as we grow up our spontaneity and willingness to express ourselves through drawing falls away. I think this is a great shame as I think when we stop drawing we stop an activity that allows us to express ourselves, explore ideas and interpret the world around us. I also think that it is fun and satisfying; experimenting with different media and marks, seeing something emerge from a blank sheet of paper.

Knots in pen 7.9.14

In my work as a community artist I lose track of the number of people who say to me "but I can't draw." It really saddens me hearing this because what they mean is 'I don't have the technical skills to render an object with photographic accuracy' and I always think that's just not what drawing is about. If I want a photographically accurate picture I'll get my camera out. Drawing is about expression and personality, exploring and understanding, trying and learning. Often, it is much more about the process than the outcome.

Hands, stressful day! 8.9.14 and 9.9.14
Knotted fabric in pencil 9.9.14

Drawing is so versatile and has an immediacy unlike any other art form.I like to think of drawing in a very broad sense, as making a mark. Using this definition a drawing can be a scrape in the mud, a doodle on a serviette or an intricate pencil study and everything in between (and beyond.) Drawing can be the seed of an idea or a fully realised finished work of art, and everything in between. Anyway, enough words, time to go and draw.

Glass jar in pen 10.9.14

Sketching out some ideas 10.9.14

Twists of thread in pen 11.9.14