Pages

Wednesday, 29 June 2016

Cumbria Decorative and Fine Arts Society: Romans and Printing

Printing using polystyrene tiles

One of the things that I really enjoy about my work is the variety of people I work with and the different groups and organisations I work with. Recently I did a workshop at Tullie House for a group of children with additional learning needs from Whitehaven school. The workshop was organised and paid for by Cumbria's Decorative and Fine Arts Society with the aim of giving the students an opportunity to explore the museum and work with an artist, a chance they may not otherwise have had.

In the Roman gallery

Sketches made in the gallery

Developing sketches into designs

We began the day with a visit to Tullie's Roman Frontier gallery. The gallery assistant had a selection of objects for us to handle and was very knowledgeable and helpful. I gave each of the students paper and a clipboard and asked them to make sketches or notes about any object that particularly caught their attention so that we could use these as starting points for our prints in the afternoon.

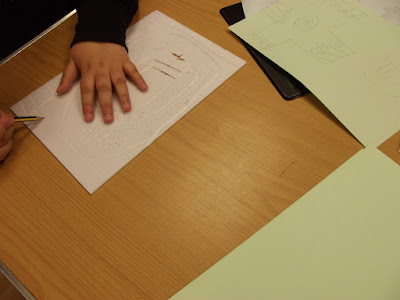
Transferring designs onto the polystyrene

Transferring designs onto the polystyrene

Transferring designs onto the polystyrene

As we were looking round the gallery I found lots of objects that I was interested in too and I made a few sketches. As time goes on I find more and more that everything is connected and I try now to use any opportunity I can to match up my personal art practice with my participatory practice. I particularly liked some of the sections of armour in the gallery, they were like scales or feathers and I was drawn to the rusted and decayed surfaces.

Printing

Printing

Printing

After looking around the gallery we started working on designs for our prints. Because I had no idea of the level of ability I would be working with until I met the students on the day I had planned an activity that could be adapted to suit a range of needs. I had planned to use polystyrene tiles as print blocks, they can be marked with pencils to create an effect similar to lino prints but without the carving tools! This is a good activity for a range of abilities because simple mark making can create interesting prints but students with more experience and skill can make more planned designs.

Printing

Printing

Printing

Designing their prints was the part of the process the students struggled with most, with the biggest barrier being a lack of confidence. Once they got going and with a bit of encouragement they made some really lovely designs. I tried to encourage them not to worry about drawing the objects exactly but to pick out the details that interested them. In this way some of the students were able to produce some really effective and inventive designs.

Printing

Printing

Printing

Once they'd made their designs we transferred them onto the polystyrene tiles. As before I encouraged them to experiment and try different ways of marking the tiles to produce different effects when we printed with them. We then moved onto the printing which is my favourite part of the process. I like printing because you can produce multiples but each one is unique, little quirks in the way the ink is transferred producing a slightly different effect each time. I also like the anticipation of making the first print, seeing if it's worked and the satisfaction of a successful print or figuring out why a print didn't work.

Finished prints

Finished prints

Finished prints

This was also the time the students started to come out of themselves a bit more, with some of them getting really enthusiastic and fired up and experimenting with mixing the inks and even printing in stripes! Each student produced a successful print and I was really impressed with some of the finished prints. I really enjoyed the day and working with the students and I hope they got something out of it too.

Finished prints

Finished prints

Finished prints

Finished prints

Finished prints

Finished prints


Thursday, 23 June 2016

Life Drawing 19.6.16

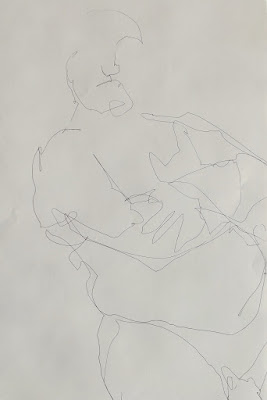
Pen, continuous line

I was beginning to get a little concerned about this session as the first model I had booked had to cancel due to a double booking and then the model I booked to replace them came down with tonsillitis. Luckily, model number three stepped up at short notice and turned up on time and in excellent form and gave us some great poses. I'm very lucky to have a great pool of models who as well as being talented models are very nice people.

Pen, continuous line

Pen, continuous line

Pen, continuous line

Pen, continuous line

Pen, continuous line

I was definitely in a hand drawing mind set for this session. Recently I've been focusing on faces to try and improve that area of my drawing as it is my weakest area but for this session I just really wanted to draw hands, so I did. I also didn't draw with anything other than my trusty pen. It's good to try new things and challenge yourself but sometimes if it ain't broke don't fix it!

'Blind' drawing

'Blind' drawing

'Blind' drawing

As usual I did some blind drawings to help me properly look at each pose and I'm pleased with some of the results of this process, my observation and eye hand communication is improving with each session. I did some more drawing with my non-dominant hand again this session, another thing I've been experimenting with. I was really pleased because it's becoming more and more natural to draw like this, I no longer have to fight the urge to swap hands and again I was very pleased with some of the drawings I produced this way.

Left handed drawing

Left handed drawing

One of the things I like about life drawing and about letting the models set their own poses is that sometimes they come up with something that sparks unexpected thoughts or responses. Our model for this session is very solidly built, I like trying to capture this strength and solidity in my drawings. However, for one of the poses he used a stick as a prop and modelled it as if he were using a walking stick. This created such an interesting contrast, this solid strong person with a walking stick, suggestive of frailty and the need for support. This made me draw in a different way, with much more scribbly and sketchy lines rather than than the strong confident lines I usually use.

Left handed drawing

Pen, continuous line

Drawing on multiple sheets

A couple of days before the session one of the artists emailed to ask if he could ask myself and some of the other artists some questions about life drawing as research for a writing project. The questions he posed prompted some interesting responses and got us all thinking about why we do it. As I write about my experiences each month I do tend to spend quite a bit of time thinking about life drawing and why I do it but having specific questions to answer led me to consider other aspects that I may not have thought about otherwise. I'm looking forward to seeing how he uses our responses...

Sunday, 19 June 2016

Marx, craft on the BBC, mental health and Eco-dyeing

Eco Dyed fabric notebook

Last night I watched a couple of interesting things on iplayer, a documentary about Karl Marx and a show called Make!Craft Britain. Now I appreciate that at first the two may not seem obvious companions but one of Marx's observations and concerns was that the workforce was being exploited and people were unable to have any creative input or expression. Marx believed that all humans are innately creative and to lead happy, productive lives and to create an ideal society we all need to be able to express our creativity and be productive. Interestingly, many of the comments from participants from the craft programme (which followed two groups of people participating in a textile workshop or a paper cutting workshop) focused around how taking time to work on a craft increased their sense of well being and happiness, that taking time to produce something "feeds the soul."

Daily drawing

Daily drawing

Daily drawing

Those of you who read my ramblings on a regular basis or have to endure them in real life will know that I have been banging on along these lines for some time, I believe that we are creative beings and we all need to have a creative outlet. It doesn't have to be a craft as such, just something that allows you to express yourselves and involves some form of physical involvement. I know that personally I need to be doing creative things to be happy, for me those things are mostly based around drawing and pretty much anything textile related. My mental health and my creativity are very closely linked, a lot of my self image and therefore confidence is tied into my work and the things I create.

Fabric notebook with stitching

Fabric notebook with stitching

Fabric notebook with stitching and feather

Despite being aware of my need to be creative and despite a good proportion of my time being spent doing creative things I am prone to periods of artists block and general despondency. During these times I feel uninspired, I lose all confidence in my work and my abilities and am generally pretty grumpy. Over time I have learnt that there are ways to help shift the block and move forward to create better work and to be a happier person. One of the most successful strategies is to just make something, quite possibly completely unrelated to whatever I'm working on at the time. Taking the time and energy just to create is often enough to give me a kick start and get me back on track.

Gathering materials in the garden

Placing plants between the pages

Placing plants between the pages

The more astute amongst you will have gathered from the thrust of this post that I have been going through one of these 'block' periods recently, wanting to work but not being sure what to do and lacking faith in my work and myself. So, I decided to follow my own advice and just do something. There was a project in a magazine (Workbox) that had caught my eye so I got the magazine out, gathered my supplies and followed the instructions (more or less) to create my own eco-dyed fabric notebook. The project was from Alice Fox and as I'm really interested in natural dyeing and eco printing I very much wanted to try it out.

All bundled up

In the steamer

Colours developing

I really enjoyed working on this mini project, it combined many of the things that I love and that excite me about art and making; ideas, experimentation, a bit of science, technical skill, subtle colours and just having a go. Because I was using this as a kick starter I wasn't at all precious about it and didn't over think it. I just made it, following a process that involved doing things I like.

Eco-dyed pages

Eco-dyed pages

Eco-dyed pages

My base fabric was an old linen tablecloth I'd bought along with some more interesting things on ebay a few years ago (tick number one: using stash fabric.) I cut it into 'pages' which I then stitched into in various ways (tick number two and three: not measuring and stitching.) I used all natural fibres so that the natural dyes would be able to colour the fibres. Having made my book I then headed into the garden and collected flowers and leaves that I liked the colours of (tick number four: being in my garden.) My garden is in its infancy and I haven't yet had time to plant many dye plants so it was a good chance to see what colours different non typical dye plants would give (tick number five: experimenting.) I sandwiched the plants between the pages with a few bits of rusty metal (iron can be used as a mordant in natural dyeing as well as being a dyestuff itself, tick number six: chemistry.) I then clamped the whole thing together with bulldog clips.

Eco-dyed pages

Eco-dyed pages

Next step was to head into the kitchen (not my natural habitat) and steam my 'package.' I left it to steam for about an hour and was a bit disappointed that not a lot appeared to have happened. However, I followed the instructions and didn't immediately open up the package, leaving it to dry out a bit overnight. To my delight when I came down the following morning I could see that colours had developed (tick number seven: patience rewarded.)

Eco-dyed pages

Eco-dyed pages

I managed to leave it until later in the afternoon before I could contain my curiosity no longer and I unwrapped the parcel to reveal some beautiful colours (tick number eight: it worked!) The pansy flowers I'd used had left some beautiful, subtle purples and lilacs and throughout my little notebook I found interesting patches of colour. I'm really pleased with my little experiment and it has not only got me doing something but has given me some ideas and inspiration for what to try next (tick number nine: block begins to lift.) Sometimes, of course, it is not as easy to get oneself going and back on the up but sometimes a simple kick start is what's needed to push forward and continue down a creative path.