Pages

Showing posts with label children. Show all posts

Tuesday, 4 July 2017

Paper Making Workshops

A stack of handmade papers

Recently I've been running some paper making workshops for Prism Arts Studio Theatre West Coast group and students at Distington Community School. Following on from their wonderful Vikings project Studio Theatre are now working on another Heritage Lottery Funded project 'Cumbria's Atomic Story.'  The story starts with Cumbrian scientist John Dalton who began looking into atomic theory. His mother was a paper maker, which is where I come in!

Ripping up paper

Ripping up paper

Ripping and soaking

For the first session I worked with the Studio Theatre participants so that they could get a good idea of the process and help me run the following session where we would be working with the school students. We had a lot of fun experimenting and we had lots of interesting discussions about paper; what we use it for, where it comes from, how it's made and how the process has changed (or not) over the past few hundred years. It was great having this session as it meant the participants were really able to engage with the school students in the following sessions and help them with the process.

Pulling sheets of paper

Pulling sheets of paper

Pulling sheets of paper

Paper making can be very complicated but it can also be very simple, I wanted to use a technique that would work well with a wide range of abilities and that would allow plenty of scope for experimentation. For this reason I chose to demonstrate how to make handmade paper using existing paper. We created a basic paper pulp using sugar paper and a bit of cellulose glue and added a few other bits (such as newspaper) as the fancy took us. The basic process is to rip up the paper, soak it, blitz it in a blender with the glue, pour the resulting pulp into a tray of water to create a suspension and then use a mould (like a screen) to create sheets of paper. Usually you would use a deckle on top of the mould to get nice neat edges on your paper but I felt this was an unnecessary complication for these workshops.

Pressing the paper onto jay cloths

Decorating the paper

Decorating the paper

One of the reasons I chose to use sugar paper was that it allowed us to explore a bit of colour theory and mixing. It's great putting two different colours together in the blender and seeing them being mixed to create a new colour. We also had quite a giggle deciding what food the resulting pulps resembled (we made a lot of mushy peas and various smoothies!)

Decorating the paper

Decorating the paper

Paper drying out

Once we had the basic paper pulp mix and had got the hang of pulling sheets of paper we were able to explore different ways of altering and customising the paper. I think this was the most exciting bit and it was very interesting watching how different people approached this stage. Some people had a very clear idea of what they were after and were very controlled and ordered, others had a much more random approach. The paper can be layered, with or without things trapped between the layers, things can be pressed into the paper, it can be pushed around to create different surfaces, layers can be gently peeled back to reveal what's underneath, the possibilities are endless. I took a limited assortment of things to add into the paper (threads, feathers and sequins) and it was amazing the variety of effects that were achieved.

Interesting textures

Interesting textures

Interesting textures

I've enjoyed running these workshops so much, it is such a fun process and there are so many variations. Seeing how differently everyone has approached it is really inspiring. In fact I've been so inspired that I've been doing some paper making of my own, It's given me a bit of a kick start in my practice as I was starting to feel a bit unsure as to where to go next but handmade paper may be the answer.

Paper Stack

Sunday, 21 May 2017

Fabric Painting at Wiggonby School

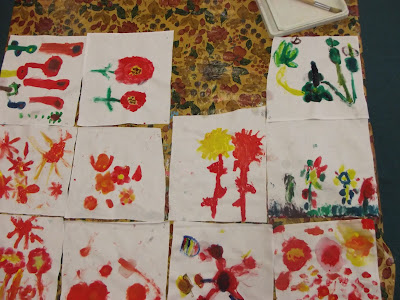
Painting Flowers

This is another of my 'catching up' posts! Last year I spent a lovely day at Wiggonby School doing felt-making with Key Stage 1. They must have enjoyed it too as I was very pleased to be asked back again, this time to work with the whole school. They chose to do some fabric painting and as it was close to Mothers Day they wanted something the children could take home. I decided that teaching them some different techniques that they could combine to make flower pictures would be a good option.


I chose to share two different methods of fabric painting, one to create a background and one to create flowers, that could be combined effectively to make a piece of floral textile art for the children to take home. As often happens, the best laid plans don't always work out so although I had time to do both types of fabric painting with both KS2 (in the morning) and KS1 (in the afternoon) we didn't have time to put the pieces together. I tend to avoid painting in most of my workshops for the simple reason of drying time. Although we had a great time and I think most the students enjoyed it and learnt something it is frustrating not being able to finish something because it's not dry (that and finding space to dry 60+ pieces of fabric!)


The first technique I showed the students was using watered down paint on wet fabric to create abstract, watercolour like backgrounds. We talked a bit about colour theory and I encouraged them to choose one primary colour and one of the complementary colours including that primary (e.g. blue and green or blue and purple) and to see how many variations they could get using just those two colours. Choosing colours this way also helps prevent all the colours being mixed together into a brown sludgy mess! We added a bit of detail to our watery backgrounds by flicking thicker paint on top, always a fun method of painting and good to help loosen up those students who can get a bit stuck with fear of getting it wrong.


The second technique I showed the students was using the fabric paint more thickly and blending the colours on the fabric (again choosing two colours that would not create brown) to create flowers. We did this on a separate piece of fabric so that when the paint was dry the flowers could be cut out and stuck onto the watercolour backgrounds to create a unique piece of art. This was the bit that I didn't get to do with the children as the fabric wasn't dry in time!


One of the things I find really interesting as I'm working with different groups and in different places is people's different perceptions of what is 'good' art and in schools in particular this often means neat and realistic. One of the things I try and encourage in all my students is a willingness to try things and take risks. Creativity is not always about getting it right, it's about trying things and finding solutions to challenges.


I often find that the students who I'm told are 'really good at art' are not the most creative, they are often technically skilled but are also often quite set in their ways and unwilling to try new things as they've found a way that works and is perceived as good so why would they do something different. This was particularly noticeable amongst the older students, when we moved onto the second technique and I asked them to sketch out some flower shapes I was met with the familiar line of 'but I can't draw.'


There are lots of arguments about drawing and the 'I can't draw' scenario and the blame is often laid at teachers doors for not being supportive or encouraging enough, however, I've never found evidence of this in a primary school. I'm inclined to agree with Joanna O'Neil (whose drawing workshop 'Sonnets and Shopping Lists' I attended at Cumberland Embroiderers Guild last year) who believes it's down to personal perception; at a certain point children realise that their drawing does not match the object they are drawing. Their perception and understanding exceeds their technical ability, for some people this is an almost insurmountable block to carrying on with drawing.


Overall it was a very enjoyable day, we had a lot of fun painting and some of the students who thought they weren't so creative found out they were and we produced some beautiful effects.


Sunday, 17 July 2016

Vikings! Weaving based adventures

Weaving

One of Prism Arts big projects this year is a project exploring our Viking heritage in West Cumbria. Funded by the Heritage Lottery and working with Studio Theatre West the project has involved researching dialect, landscape, warfare, textiles and many other aspects of Viking life. There have also been lots of research visits, including a trip to the Isle of Man.

Inspiration from the Isle of Man

Inspiration from the Isle of Man

Inspiration from the Isle of Man

I have been involved in the project in a small way looking at textiles and taking part in the Isle of Man trip. I've really enjoyed working on this project, it's given me different avenues to research that I wouldn't have necessarily come across otherwise.

Inspiration from the Isle of Man

Inspiration from the Isle of Man

Inspiration from the Isle of Man

During my first session on this project a Viking reenactor visited to demonstrate some natural dyeing techniques the Vikings would have used. Natural dyeing is something I've been interested in for a long time and it was really interesting to hear about different processes and dye stuffs. I think that this is an area of my personal practice I would really like to develop more so I enjoyed the session and it gave me some new avenues to explore. Since then I've been playing about more with plant dyes and am currently making a list of dye plants to grow at home.

Viking reenactor: Natural Dyeing

Viking reenactor: Natural Dyeing

Natural Dye-stuffs

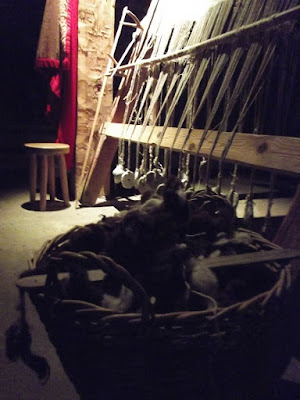
My main contribution to this project has been to run weaving sessions. Almost every Viking homestead would probably have had a loom set up and cloth would have been made for clothing, the home and for trade. I've really enjoyed these sessions, seeing how each individual child and participant has approached the weaving in a different way has really inspired me and encouraged me to 'play' more in my own work.

Drop spinning!

Drop spinning

Hand-spun yarn and felted cords

For my first hands on session I did some felt making and a bit of drop spinning with the children and participants. Whilst we may not have produced a huge amount of usable thread it was hilarious and everyone enjoyed trying to keep the spindle going and draw out the fleece at the same time. I got the children to work in pairs and it was lovely seeing how absorbed they were in the task and how proud they were when they got it working!

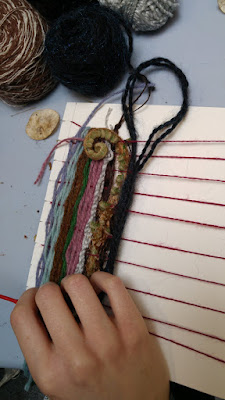
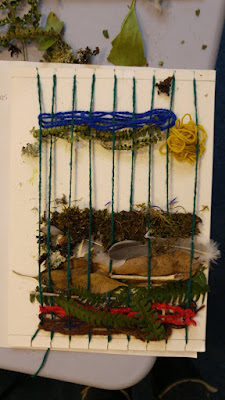
Weaving on cardboard looms

Weaving on cardboard looms

Weaving on cardboard looms

I then continued my sessions looking at weaving. Because time was relatively limited I made simple cardboard looms so that everyone could have a go and learn the basics. I also took along some larger simple frame looms and peg looms so that if people really got into it they could take it further. I only had a half day session with each of four groups of four children (16 all together!) but the Studio Theatre West Coast participants were with me for all those session so got two full days of weaving.
Weaving on cardboard looms

Weaving on cardboard looms

Weaving on cardboard looms

As I mentioned before it was fascinating seeing the different approaches everyone took and it was also fascinating seeing which ways of weaving worked best for the participants. The children created a range of imaginative and beautiful weaves, with varying degrees of technical skill, and enjoyed experimenting with incorporating different materials, such as ribbons, twigs and feathers.

Woven on a cardboard loom

Working on a frame loom

Sculptural Weaving on a frame loom

I was really pleased with how well the Studio Theatre participants took to it, I didn't expect them to get so involved but one of the participants (who no one expected to go for textiles) produced the most beautiful and unique pieces by manipulating the warp threads and working tightly in small sections back and forth. I love the structural quality and careful colour choices of the work he's made. Interestingly the other participants struggled with weaving on the frames but worked really well with peg looms. I find it endlessly fascinating how different minds work and it just goes to show that it's always worth putting the effort into finding a different way that works for you.

Working on a peg loom

Working on a peg loom